Artifact Restoration By Electrolysis
How to restore your artifacts with these simple instructions.
WARNING! PROCESS CAN BE DANGEROUS! KEEP AWAY FROM CHILDREN AND ANIMALS!
While attempting electrolysis, extreme caution should be used. Always do outdoors, in a well ventilated area. Process creates gases that can be harmfull if inhaled in moderate to large quanities, not to mention water and electricity do not mix! These gases can be slightly flamable so use common sense and don't hold a cigarette in your mouth while hovering over the bucket. Be sure to keep your charger a safe distance (preferably higher) from the bucket of water/soda.
DISCLAIMER:
As said before, The gases emmited could be flammable and possibly explosive. We are not suggesting that you should perform this method of artifact restoration. That is completely left up to anybody interested. Please keep in mind that there are risks and the process should be done by a professional. This information is provided for educational purposes only. We will not be held liable in any way for those that wish to continue further.
First Step (What you need to get goin)
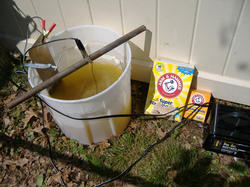
Shown in the picture are all the things you need to get started. There are many different ways to do electrolysis but this is the way I (Brent) do it. You will need a plastic/non-conductive bucket (5 gal is perfect). A battery charger. Regarless of popular belief, bigger is not always better. Too many amps can "burn" your artifact up. A basic Shumacher 6 amp charger (24.99 at Northern Tool Suppy) is what I use and does a great job. If you use a large charger, pay extra attention. Make sure your charger is a Direct Connect and not one of those cheap, worthless "smart start" chargers. The computer chip in them will read short and it will not work. Next you will need something to make the water caustic. The best thing I have found to work is Arm and Hammer's Super Washing Soda but you can use any kind of baking soda. Next you will need is a sacraficial electrode. In theory, stainless steel works the best but is discouraged because of a toxic chromium reaction that is possible during the breakdown of the sacraficial electrode. Iron rebar or strips of thin regular steel is recommended. Use C clamps or vice grips to hold the saraficial electrode on the other side of the bucket from where your artifact is. MAKE SURE THE ARTIFACT AND THE SACRAFICIAL ELECTRODE DON"T TOUCH! Next you will need plenty of Copper Wire. It has to be flexible to wrap around the piece your cleaning, and make a good connection. 12-18 gauge is the best wire, but use whatever you feel works or is avaliable. Make sure to wrap it well but leave "naked spaces so the rust and corrosion can flake off. The last thing you will need is something to wrap the copper wire around to hook the Negative lead to. I use a copper pipe over the top of the bucket, but you can use a wood 2x4 if no copper pipe is avalible. Just make sure your Negative lead from your charger is connected good to the wire that is wrapped around your piece your cleaning.
Second Step, The Process
Mix 1/2 cup of soda (washing or baking) to 4 -4 1/2 gallons of water in 5 gal bucket. MIX WELL! Positve lead should be hooked on the electrode while the negative lead shoud be hooked to the piece that is being cleaned. While your artifact is being cleaned, you should see bubbles coming off of the water almost looking like the appearance of boiling soup. The more bubbles you see, the better (better connection). However, just like mentioned before, make sure you don't get your piece too hot (too many amps) or "cook" it for too long. A cannonball or Rifled shell can take from 24 hours to 2 weeks depending on the amount of rust and corrosion. A piece of a cannonbal/shell usually is done within 12-48 hours. You can do multiple items but allow extra time. Real small items take even less time. If your pieces are not getting done fast enough, take them out, unwrap and take a wire brush to them, rewrap them and put em back in. Sometimes you need to do this to make sure you have good contact with the metal; this should be repeated when a piece is done to clear it of the flaked off corrosion.
Finished Product
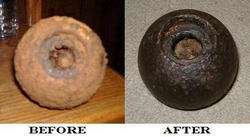
As you can see, the finished product should have the majority of rust removed. The iron should retain a black appearance. If it has a shiney appearance, that means you left it on too long or pumped too many amps into it. You want the natural black patina to show age while removing the corrosive rust. Coins and other non precious metals can be electrolysised but you have to be carefull as it takes a considerably shorter amount of time to clean. This cannonball was done by Anthony Skok which is a pro at electrolysis. If your results are not as nice as this at first, don't get discouraged. Just like anything else, it takes practice to get good at it. Coat with your choice of poly-urethane or finishing oil. We all use Formby's Tung oil (low gloss) which works the best. You can get it at wal-mart or any home improvement store. Enjoy your newly cleaned artifact!

